


As a seasoned supplier of floor reducers, I've witnessed firsthand the transformative power these unassuming yet crucial components bring to flooring projects. Floor reducers are not just simple pieces of hardware; they are the unsung heroes that ensure a seamless transition between different floor surfaces, enhancing both the aesthetic appeal and functionality of any space. In this blog, I'll delve into the inner workings of floor reducers, exploring their design, installation, and the benefits they offer.

Understanding the Basics of Floor Reducers
At its core, a floor reducer is a molding strip designed to bridge the gap between two different floor materials or thicknesses. This transition is essential for several reasons. Firstly, it provides a smooth and safe surface for foot traffic, eliminating tripping hazards that can occur at the edge of a sudden change in floor height. Secondly, it enhances the overall visual appeal of the space by creating a cohesive and professional look. Whether you're dealing with a transition between laminate and hardwood, vinyl and tile, or any other combination, a floor reducer ensures that the transition is both functional and aesthetically pleasing.
Design and Construction
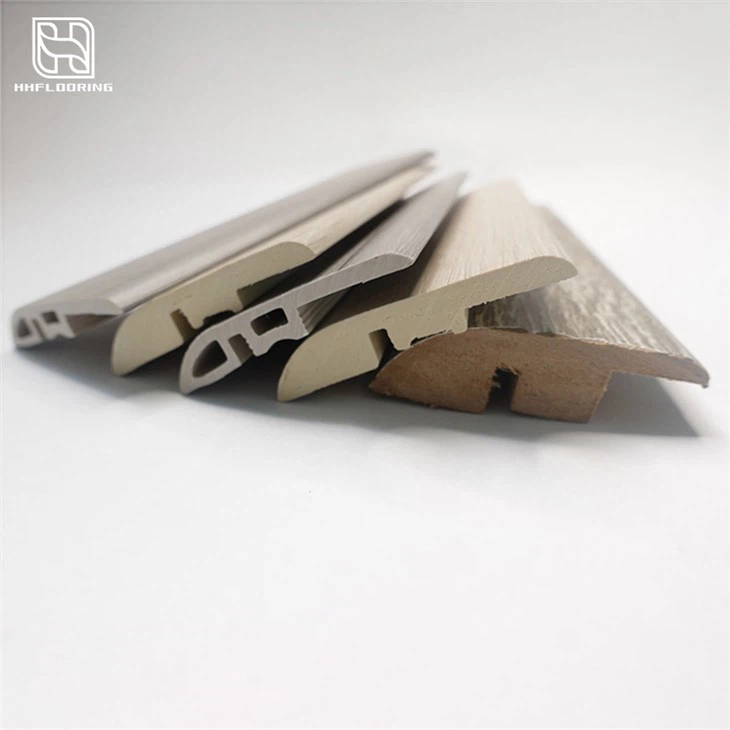
Floor reducers come in a variety of designs and materials to suit different flooring applications. The most common types include Laminate Reducer Molding and Vinyl Plank Reducer. These reducers are typically made from materials such as wood, vinyl, or metal, each offering its own set of advantages.
Wooden floor reducers are a popular choice for their natural beauty and durability. They can be stained or painted to match the surrounding flooring, providing a seamless and customized look. Vinyl reducers, on the other hand, are known for their affordability, flexibility, and resistance to moisture. They are ideal for areas prone to spills or high humidity, such as kitchens and bathrooms. Metal reducers, such as aluminum or stainless steel, offer a sleek and modern look, as well as excellent durability and resistance to wear and tear.
The design of a floor reducer is carefully engineered to ensure a smooth and gradual transition between the two floor surfaces. Most reducers feature a tapered edge that gradually slopes from the higher floor to the lower floor, creating a gentle ramp that is easy to walk on. Some reducers also include a lip or groove that helps to secure the reducer in place and prevent it from shifting or moving over time.
Installation Process
Installing a floor reducer is a relatively straightforward process that can be completed by most DIY enthusiasts. However, it's important to follow the manufacturer's instructions carefully to ensure a proper and secure installation. Here are the general steps involved in installing a floor reducer:
- Prepare the Surface: Before installing the floor reducer, make sure the surfaces of both floors are clean, dry, and free of any debris or contaminants. Use a vacuum cleaner or broom to remove any dust or dirt, and wipe the surfaces with a damp cloth to remove any stains or spills.
- Measure and Cut the Reducer: Measure the length of the transition area and cut the floor reducer to the appropriate length using a saw or a pair of scissors. Make sure to cut the reducer at a 45-degree angle to ensure a clean and professional-looking joint.
- Apply Adhesive: Apply a thin layer of adhesive to the back of the floor reducer using a trowel or a caulking gun. Make sure to spread the adhesive evenly over the entire surface of the reducer, leaving no gaps or air bubbles.
- Position the Reducer: Carefully position the floor reducer over the transition area, aligning it with the edges of both floors. Press the reducer firmly into place, making sure it is level and flush with the surrounding surfaces. Use a rubber mallet or a block of wood to tap the reducer into place, ensuring a secure and tight fit.
- Secure the Reducer: Once the floor reducer is in place, use nails, screws, or adhesive to secure it to the floor. Make sure to follow the manufacturer's instructions regarding the type and size of fasteners to use, as well as the spacing between the fasteners.
- Finish the Edges: After the floor reducer is installed, use a putty knife or a sandpaper to smooth out any rough edges or seams. You can also apply a sealant or a finish to the reducer to protect it from moisture and wear and tear.
Benefits of Using Floor Reducers
Using floor reducers in your flooring projects offers several benefits, both practical and aesthetic. Here are some of the key advantages of using floor reducers:
- Safety: Floor reducers eliminate tripping hazards by providing a smooth and gradual transition between two different floor surfaces. This is especially important in areas with high foot traffic, such as hallways, stairways, and entryways.
- Aesthetics: Floor reducers enhance the overall visual appeal of the space by creating a cohesive and professional look. They can be used to match the surrounding flooring or to add a decorative touch to the transition area.
- Functionality: Floor reducers help to protect the edges of the flooring from damage and wear and tear. They also prevent dirt, dust, and debris from accumulating in the transition area, making it easier to clean and maintain.
- Versatility: Floor reducers can be used in a variety of flooring applications, including residential and commercial settings. They are suitable for use with a wide range of floor materials, such as laminate, hardwood, vinyl, tile, and carpet.
Conclusion
In conclusion, floor reducers are an essential component of any flooring project. They provide a smooth and safe transition between different floor surfaces, enhance the overall visual appeal of the space, and offer several practical benefits. As a supplier of high-quality floor reducers, I'm committed to providing my customers with the best products and services possible. If you're in the market for a floor reducer, I encourage you to contact me to discuss your specific needs and requirements. I'll be happy to help you choose the right floor reducer for your project and provide you with all the information and support you need to ensure a successful installation.
References
- "Flooring Installation Guide." National Wood Flooring Association.
- "Vinyl Flooring Installation Manual." Vinyl Institute.
- "Laminate Flooring Installation Instructions." Laminate Flooring Association.